Running in Azure
This section describes how to deploy a leader node in Azure and launch a Toil cluster from the leader node to run workflows. You’ll need an account in Azure prior to executing the steps in the document. To setup Azure, see Preparing your Azure environment.
Note
Azure is available in Toil for experimental purposes. Only AWS is currently supported in Toil.
Launch a leader node in Azure
Toil comes with a cluster template to facilitate easy deployment of clusters running Toil on Microsoft Azure. The template allows these clusters to be created and managed through the Azure portal.
To use the template to set up a Toil Mesos cluster on Azure, follow these steps.

Click on the blue deploy button above, or open the deploy link in your browser. If necessary, sign into the Microsoft account that you use for Azure.
You should be presented with a screen resembling the following:
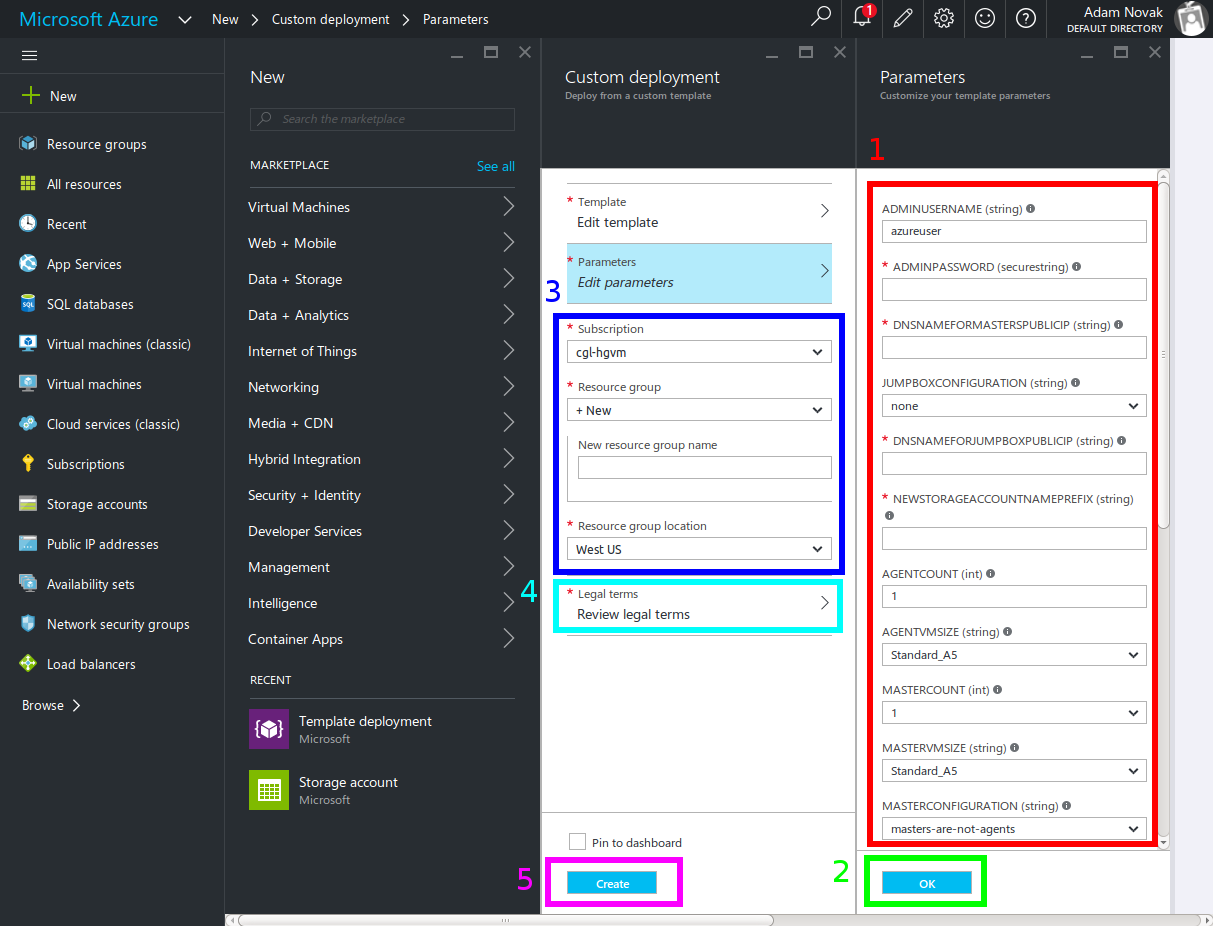
Fill out the form on the far right (marked 1 in the image) with the following information, then click OK (marked 2 in the image). Important fields for which you will want to override the defaults are in bold:
| AdminUsername | A username for logging into the cluster. It’s easiest to set this to match your username on your local machine. |
| AdminPassword | Choose a strong root password. (Since you’ll be using SSH keys, you won’t actually need to use this to log in in practice, so choose something long and complex and store it safely.) |
| DnsNameForMastersPublicIp | Enter a unique DNS name fragment to identify your cluster within your region. For example, if your cluster is in |
| JumpboxConfiguration | If you’d like, you can select to have either a Linux or Windows “jumpbox” with remote desktop software set up on the cluster’s internal network. Disabled by default. |
| DnsNameForJumpboxPublicIp | If you’re using a jumpbox, enter another unique DNS name fragment here to set its DNS name. See DnsNameForMastersPublicIp |
| NewStorageAccountNamePrefix | Enter a globally-unique prefix to be used in the names of new storage accounts created to support the cluster. Storage account names must be 3 to 24 characters long, include only numbers and lowercase letters, and be globally unique. Since the template internally appends to this prefix, it must be shorter than the full 24 characters. Up to 20 should work. |
| AgentCount | Choose how many agents (i.e. worker nodes) you want in the cluster. Be mindful of your Azure subscription limits on VMs and total cores (both limited to 20 per region by default); if you ask for more agents or more total cores than you are allowed, you won’t get them all, errors will occur, and (like my paycheck) the resulting cluster will be smaller than you want it to be. |
| AgentVmSize | Choose from the available VM instance sizes to determine how big each node will be. Again, be mindful of your Azure subscription’s core limits. Also be mindful of how many cores and how much disk and memory your Toil jobs will need: if any requirements is greater than that provided by an entire node, a job may never be schduled to run. |
| MasterCount | Choose the number of masters or leader nodes for the cluster. By default, only one is used, because while the underlying Mesos batch system supports master failover, Toil currently does not. You can increase this if multiple Toil jobs will be running and you want them to run from different leader nodes. Remember that the leader nodes also count against your VM and core limits. |
| MasterVmSize | Select one of the available VM sizes to use for the leader nodes. Generally, the leader node can be relatively small. |
| MasterConfiguration | This is set to masters-are-not-agents by
default, meaning that the leader nodes won’t
run any jobs themselves. If you’re worried
about wasting unused computing power on your
leader nodes, you can set this to
masters-are-agents to allow them to run
jobs. However, this may slow them down for
interactive use, making it harder to monitor
and control your Toil workflows. |
| JumpboxVmSize | If you’re using a jumpbox, you can select a VM instance size for it to use here. Again, remember that it counts against your Azure subscription limits. |
| ClusterPrefix | This prefix is used to generate the internal hostnames of all the machines in the cluster. You can use it to give clusters friendly names to differentiate them. It has to be a valid part of a DNS name; you might consider setting it to match DnsNameForMastersPublicIp. You can also leave it as the default. |
| SwarmEnabled | Set to true to install Swarm, a system
for scheduling Docker containers. Toil doesn’t
use Swarm (and it has a tendency to allocate
all the cluster’s resources for itself), so it
should be set to false unless you need it. |
| MarathonEnabled | Set to true to install Marathon, a
scheduling system for persistent jobs run in
Docker containers. Toil doesn’t require this,
so you can leave it set to false, unless
you need it. |
| ChronosEnabled | Set to true to install Chronos, a way to
periodically run jobs on the cluster. Toil
doesn’t require this, so you can leave it set
to false, unless you need it. |
| ToilEnabled | You should probably leave this set to true.
Setting it to false will keep Toil from
being installed on the cluster, which rather
defeats the point. |
| SshRsaPublicKey | Replace default with your SSH public key
contents, beginning with ssh-rsa. Paste
the whole line. Only one key is supported, and,
as the name suggests, it must be an RSA key.
This enables public key login on the cluster. |
| GithubSource | GitHub repository to install Toil from. Set to
BD2kGenomics/toil by default. Change it if
you want to use a non-standard fork on GitHub. |
| GithubBranch | Branch to install Toil from. e.g.
release/3.1.x for the latest release of
Toil 3.1. Defaults to master (which may
have bugs or breaking changes introduced since
the last release). |
- Choose a subscription and select or create a Resource Group (marked 3 in the screenshot). If creating a Resource Group, select a region in which to place it. It is recommended to create a new Resource Group for every cluster; the template creates a large number of Azure entitites besides just the VMs (like virtual networks), and if they are organized into their own Resource Group they can all be cleaned up at once when you are done with the cluster by deleting the Resource Group.
- Read the Azure Terms of Service (by clicking on the item marked “4” in the screenshot) and accept them by clicking the “Create” button on the right (not shown). This is the contract that you are accepting with Microsoft, under which you are purchasing the cluster.
- Click the main “Create” button (marked “5” in the screenshot). This will kick off the process of creating the cluster.
- Eventually, you’ll receive a notification (Bell icon on the top bar of the Azure UI) letting you know that your cluster has been created. At this point, you should be able to connect to it; however, note that it will not be ready to run any Toil jobs until it is finished setting itself up.
Launch a Toil Mesos Cluster
- SSH into the first (and by default only) leader node. For this, you need to
know the values AdminUsername and DnsNameForMastersPublicIp were set to
above, and the name of the region you placed your cluster in. If you named
your user
phoebeand named your clustertoilisgreat, and placed it in thecentralusregion, the hostname of the cluster would betoilisgreat.centralus.cloudapp.azure.com, and you would want to connect asphoebe. SSH is forwarded through the cluster’s load balancer to the first leader node on port 2211, so you would runssh phoebe@toilisgreat.centralus.cloudapp.azure.com -p 2211. - Wait for the leader node to finish setting itself up. Run
tail -f /var/log/azure/cluster-bootstrap.logand wait until the log reaches the linecompleted mesos cluster configuration. At that point, killtailwith actrl-c. Your leader node is now ready. - At this point, you can start running Toil jobs, using the Mesos batch system
(by passing
--batchSystem mesos --mesosMaster 10.0.0.5:5050) and the Azure job store (for which you will need a separate Azure Storage account set up, ideally in the same region as your cluster but in a different Resource Group). The nodes of the cluster may take a few more minutes to finish installing, but when they do they will report in to Mesos and begin running any scheduled jobs. - Whan you are done running your jobs, go back to the Azure portal, find the Resource Group you created for your cluster, and delete it. This will destroy all the VMs and any data stored on them, and stop Microsoft charging you money for keeping the cluster around. As long as you used a separate Asure Storage account in a different Resource Group, any information kept in the job stores and file stores you were using will be retained.
For more information about how your new cluster is organized, for information on how to access the Mesos Web UI, or for troubleshooting advice, please see the template documentation.
