Running in AWS
Toil jobs can be run on a variety of cloud platforms. Of these, Amazon Web Services (AWS) is currently the best-supported solution. Toil provides the Toil Cluster Utilities to conveniently create AWS clusters, connect to the leader of the cluster, and then launch a workflow. The leader handles distributing the jobs over the worker nodes and autoscaling to optimize costs.
The Running a Workflow with Autoscaling section details how to create a cluster and run a workflow that will dynamically scale depending on the workflow’s needs.
The Static Provisioning section explains how a static cluster (one that won’t automatically change in size) can be created and provisioned (grown, shrunk, destroyed, etc.).
Preparing your AWS environment
To use Amazon Web Services (AWS) to run Toil or to just use S3 to host the files during the computation of a workflow, first set up and configure an account with AWS:
If necessary, create and activate an AWS account
Next, generate a key pair for AWS with the command (do NOT generate your key pair with the Amazon browser):
$ ssh-keygen -t rsa
This should prompt you to save your key. Please save it in
~/.ssh/id_rsa
Now move this to where your OS can see it as an authorized key:
$ cat ~/.ssh/id_rsa.pub >> ~/.ssh/authorized_keys
Next, you’ll need to add your key to the ssh-agent:
$ eval `ssh-agent -s`
$ ssh-add
If your key has a passphrase, you will be prompted to enter it here once.
You’ll also need to chmod your private key (good practice but also enforced by AWS):
$ chmod 400 id_rsa
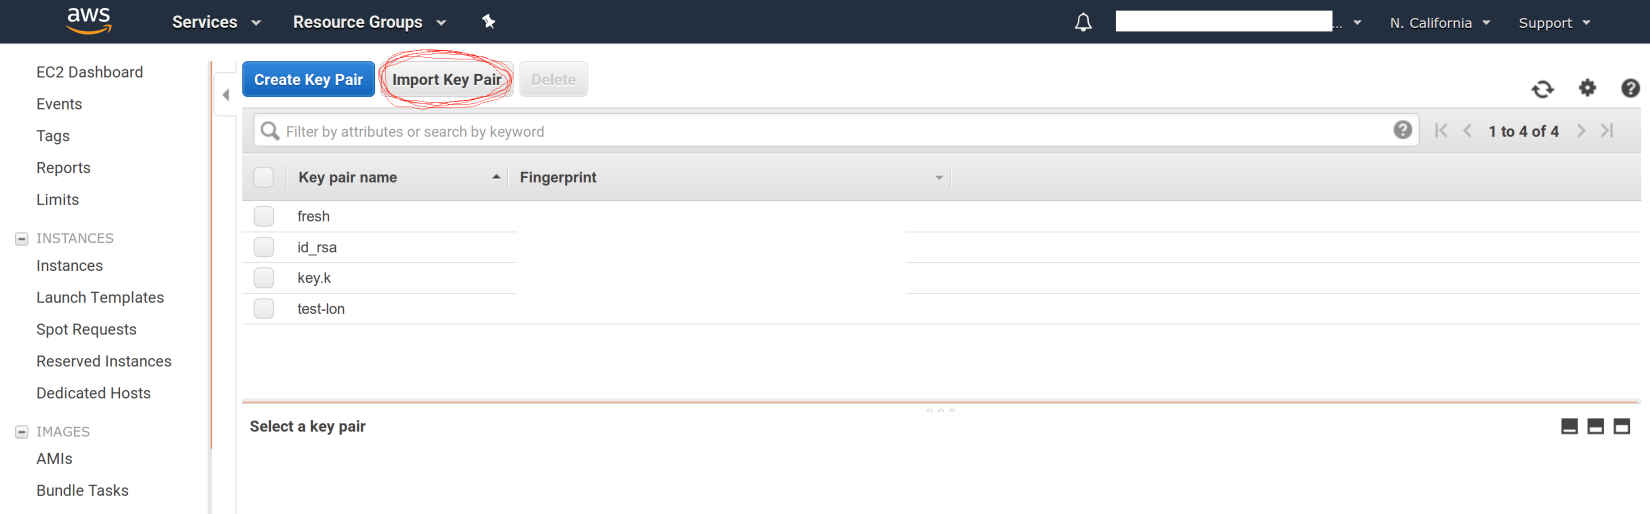
Now you’ll need to add the key to AWS via the browser. For example, on us-west1, this address would accessible at:
https://us-west-1.console.aws.amazon.com/ec2/v2/home?region=us-west-1#KeyPairs:sort=keyName
Now click on the “Import Key Pair” button to add your key:
Next, you need to create an AWS access key. First go to the IAM dashboard, again; for “us-west1”, the example link would be here:
https://console.aws.amazon.com/iam/home?region=us-west-1#/home
The directions (transcribed from: https://docs.aws.amazon.com/general/latest/gr/managing-aws-access-keys.html ) are now:
On the IAM Dashboard page, choose your account name in the navigation bar, and then choose My Security Credentials.
Expand the Access keys (access key ID and secret access key) section.
Choose Create New Access Key. Then choose Download Key File to save the access key ID and secret access key to a file on your computer. After you close the dialog box, you can’t retrieve this secret access key again.
Now you should have a newly generated “AWS Access Key ID” and “AWS Secret Access Key”. We can now install the AWS CLI and make sure that it has the proper credentials:
$ pip install awscli --upgrade --user
Now configure your AWS credentials with:
$ aws configure
Add your “AWS Access Key ID” and “AWS Secret Access Key” from earlier and your region and output format:
" AWS Access Key ID [****************Q65Q]: "
" AWS Secret Access Key [****************G0ys]: "
" Default region name [us-west-1]: "
" Default output format [json]: "
This will create the files ~/.aws/config and ~/.aws/credentials.
If not done already, install toil (example uses version 5.12.0, but we recommend the latest release):
$ virtualenv venv
$ source venv/bin/activate
$ pip install toil[all]==5.12.0
Now that toil is installed and you are running a virtualenv, an example of launching a toil leader node would be the following (again, note that we set TOIL_APPLIANCE_SELF to toil version 5.3.0 in this example, but please set the version to the installed version that you are using if you’re using a different version):
$ toil launch-cluster <cluster-name> \
      --clusterType kubernetes \
      --leaderNodeType t2.medium \
      --nodeTypes t2.medium -w 1 \
      --zone us-west-1a \
      --keyPairName id_rsa
To further break down each of these commands:
toil launch-cluster — Base command in toil to launch a cluster.
<cluster-name> — Just choose a name for your cluster.
–clusterType kubernetes — Specify the type of cluster to coordinate and execute your workflow. Kubernetes is the recommended option.
–leaderNodeType t2.medium — Specify the leader node type. Make a t2.medium (2CPU; 4Gb RAM; $0.0464/Hour). List of available AWS instances: https://aws.amazon.com/ec2/pricing/on-demand/
–nodeTypes t2.medium -w 1 — Specify the worker node type and the number of worker nodes to launch. The Kubernetes cluster requires at least 1 worker node.
–zone us-west-1a — Specify the AWS zone you want to launch the instance in. Must have the same prefix as the zone in your awscli credentials (which, in the example of this tutorial is: “us-west-1”).
–keyPairName id_rsa — The name of your key pair, which should be “id_rsa” if you’ve followed this tutorial.
Note
You can set the TOIL_AWS_TAGS environment variable to a JSON object to specify arbitrary tags for AWS resources.
For example, if you export TOIL_AWS_TAGS='{"project-name": "variant-calling"}' in your shell before using Toil,
AWS resources created by Toil will be tagged with a project-name tag with the value variant-calling.
You can also set the TOIL_APPLIANCE_SELF environment variable to one of the Toil project’s Docker images, if you would like to launch a cluster using a different version of Toil than the one you have installed.
AWS Job Store
Using the AWS job store is straightforward after you’ve finished Preparing your AWS environment; all you need to do is specify the prefix for the job store name.
To run the sort example sort example with the AWS job store you would type
$ python3 sort.py aws:us-west-2:my-aws-sort-jobstore
Toil Provisioner
The Toil provisioner is the component responsible for creating resources in
Amazon’s cloud. It is included in Toil alongside the [aws] extra and allows
us to spin up a cluster.
Getting started with the provisioner is simple:
Make sure you have Toil installed with the AWS extras. For detailed instructions see Installing Toil with Extra Features.
You will need an AWS account and you will need to save your AWS credentials on your local machine. For help setting up an AWS account see here. For setting up your AWS credentials follow instructions here.
The Toil provisioner makes heavy use of the Toil Appliance, a Docker image that bundles Toil and all its requirements (e.g. Kubernetes). This makes deployment simple across platforms, and you can even simulate a cluster locally (see Developing with Docker for details).
Choosing Toil Appliance Image
When using the Toil provisioner, the appliance image will be automatically chosen
based on the pip-installed version of Toil on your system. That choice can be
overridden by setting the environment variables TOIL_DOCKER_REGISTRY and TOIL_DOCKER_NAME or
TOIL_APPLIANCE_SELF. See Environment Variables for more information on these variables. If
you are developing with autoscaling and want to test and build your own
appliance have a look at Developing with Docker.
For information on using the Toil Provisioner have a look at Running a Workflow with Autoscaling.
Details about Launching a Cluster in AWS
Using the provisioner to launch a Toil leader instance is simple using the launch-cluster command. For example,
to launch a Kubernetes cluster named “my-cluster” with a t2.medium leader in the us-west-2a zone, run
(venv) $ toil launch-cluster my-cluster \
             --clusterType kubernetes \
             --leaderNodeType t2.medium \
             --nodeTypes t2.medium -w 1 \
             --zone us-west-2a \
             --keyPairName <AWS-key-pair-name>
The cluster name is used to uniquely identify your cluster and will be used to
populate the instance’s Name tag. Also, the Toil provisioner will
automatically tag your cluster with an Owner tag that corresponds to your
keypair name to facilitate cost tracking. In addition, the ToilNodeType tag
can be used to filter “leader” vs. “worker” nodes in your cluster.
The leaderNodeType is an EC2 instance type. This only affects the leader node.
The --zone parameter specifies which EC2 availability zone to launch the cluster in.
Alternatively, you can specify this option via the TOIL_AWS_ZONE environment variable.
Note: the zone is different from an EC2 region. A region corresponds to a geographical area
like us-west-2 (Oregon), and availability zones are partitions of this area like
us-west-2a.
By default, Toil creates an IAM role for each cluster with sufficient permissions
to perform cluster operations (e.g. full S3, EC2, and SDB access). If the default permissions
are not sufficient for your use case (e.g. if you need access to ECR), you may create a
custom IAM role with all necessary permissions and set the --awsEc2ProfileArn parameter
when launching the cluster. Note that your custom role must at least have
these permissions in order for the Toil cluster to function properly.
In addition, Toil creates a new security group with the same name as the cluster name with
default rules (e.g. opens port 22 for SSH access). If you require additional security groups,
you may use the --awsEc2ExtraSecurityGroupId parameter when launching the cluster.
Note: Do not use the same name as the cluster name for the extra security groups as
any security group matching the cluster name will be deleted once the cluster is destroyed.
For more information on options try:
(venv) $ toil launch-cluster --help
Static Provisioning
Toil can be used to manage a cluster in the cloud by using the Toil Cluster Utilities. The cluster utilities also make it easy to run a toil workflow directly on this cluster. We call this static provisioning because the size of the cluster does not change. This is in contrast with Running a Workflow with Autoscaling.
To launch worker nodes alongside the leader we use the -w option:
(venv) $ toil launch-cluster my-cluster \
             --clusterType kubernetes \
             --leaderNodeType t2.small -z us-west-2a \
             --keyPairName <AWS-key-pair-name> \
             --nodeTypes m3.large,t2.micro -w 1,4 \
             --zone us-west-2a
This will spin up a leader node of type t2.small with five additional workers — one m3.large instance and four t2.micro.
Currently static provisioning is only possible during the cluster’s creation. The ability to add new nodes and remove existing nodes via the native provisioner is in development. Of course the cluster can always be deleted with the Destroy-Cluster Command utility.
Uploading Workflows
Now that our cluster is launched, we use the Rsync-Cluster Command utility to copy the workflow to the leader. For a simple workflow in a single file this might look like
(venv) $ toil rsync-cluster -z us-west-2a my-cluster toil-workflow.py :/
Note
If your toil workflow has dependencies have a look at the Auto-Deployment section for a detailed explanation on how to include them.
Running a Workflow with Autoscaling
Toil can create an autoscaling Kubernetes cluster for you using the AWS provisioner. Autoscaling is a feature of running Toil in a cloud whereby additional cloud instances are launched as needed to run the workflow.
Note
Make sure you’ve done the AWS setup in Preparing your AWS environment.
To set up a Kubernetes cluster, simply use the --clusterType=kubernetes
command line option to toil launch-cluster. To make it autoscale, specify a
range of possible node counts for a node type (such as -w 1-4). The cluster
will automatically add and remove nodes, within that range, depending on how
many seem to be needed to run the jobs submitted to the cluster.
For example, to launch a Toil cluster with a Kubernetes scheduler, run:
(venv) $ toil launch-cluster <cluster-name> \
        --provisioner=aws \
        --clusterType kubernetes \
        --zone us-west-2a \
        --keyPairName <AWS-key-pair-name> \
        --leaderNodeType t2.medium \
        --leaderStorage 50 \
        --nodeTypes t2.medium -w 1-4 \
        --nodeStorage 20 \
        --logDebug
Behind the scenes, Toil installs kubeadm and configures the kubelet on the Toil leader and all worker nodes. This Toil cluster can then schedule jobs using Kubernetes.
Note
You should set at least one worker node, otherwise Kubernetes would not be able to schedule any jobs. It is also normal for this step to take a while.
As a demonstration, we will use sort.py
again, but run it on a Toil cluster with Kubernetes. First, download this file
and put it to the current working directory.
We then need to copy over the workflow file and SSH into the cluster:
(venv) $ toil rsync-cluster -z us-west-2a <cluster-name> sort.py :/root
(venv) $ toil ssh-cluster -z us-west-2a <cluster-name>
Remember to replace <cluster-name> with your actual cluster name, and feel
free to use your own cluster configuration and/or workflow files. For more
information on this step, see the corresponding section of the
Static Provisioning tutorial.
Important
Some important caveats about starting a toil run through an ssh session are explained in the Ssh-Cluster Command section.
Now that we are inside the cluster, a Kubernetes environment should already be configured and running. To verify this, simply run:
$ kubectl get nodes
You should see a leader node with the Ready status. Depending on the number
of worker nodes you set to create upfront, you should also see them displayed
here.
Additionally, you can also verify that the metrics server is running:
$ kubectl get --raw "/apis/metrics.k8s.io/v1beta1/nodes"
If there is a JSON response (similar to the output below), and you are not seeing any errors, that means the metrics server is set up and running, and you are good to start running workflows.
{"kind":"NodeMetricsList","apiVersion":"metrics.k8s.io/v1beta1", ...}
Note
It’ll take a while for all nodes to get set up and running, so you might not be able to see all nodes running at first. You can start running workflows already, but Toil might complain until the necessary resources are set up and running.
Now we can run the workflow:
$ python3 sort.py \
        --batchSystem kubernetes \
        aws:<region>:<job-store-name>
Make sure to replace <region> and <job-store-name>. It is required
to use a cloud-accessible job store like AWS or Google when using the Kubernetes
batch system.
The sort workflow should start running on the Kubernetes cluster set up by Toil.
This workflow would take a while to execute, so you could put the job in the
background and monitor the Kubernetes cluster using kubectl. For example,
you can check out the pods that are running:
$ kubectl get pods
You should see an output like:
NAME                                                      READY   STATUS              RESTARTS   AGE
root-toil-a864e1b0-2e1f-48db-953c-038e5ad293c7-11-4cwdl   0/1     ContainerCreating   0          85s
root-toil-a864e1b0-2e1f-48db-953c-038e5ad293c7-14-5dqtk   0/1     Completed           0          18s
root-toil-a864e1b0-2e1f-48db-953c-038e5ad293c7-7-gkwc9    0/1     ContainerCreating   0          107s
root-toil-a864e1b0-2e1f-48db-953c-038e5ad293c7-9-t7vsb    1/1     Running             0          96s
If a pod failed for whatever reason or if you want to make sure a pod isn’t
stuck, you can use kubectl describe pod <pod-name> or
kubectl logs <pod-name> to inspect the pod.
If everything is successful, you should be able to see an output file from the sort workflow:
$ head sortedFile.txt
You can now run your own workflows!
Preemptibility
Toil can run on a heterogeneous cluster of both preemptible and non-preemptible nodes. Being a preemptible node simply means that the node may be shut down at any time, while jobs are running. These jobs can then be restarted later somewhere else.
A node type can be specified as preemptible by adding a spot bid in dollars, after a colon, to its entry in the list of node types provided with
the --nodeTypes flag. If spot instance prices rise above your bid, the preemptible nodes will be shut down.
For example, this cluster will have both preemptible and non-preemptible nodes:
(venv) $ toil launch-cluster <cluster-name> \
        --provisioner=aws \
        --clusterType kubernetes \
        --zone us-west-2a \
        --keyPairName <AWS-key-pair-name> \
        --leaderNodeType t2.medium \
        --leaderStorage 50 \
        --nodeTypes t2.medium -w 1-4 \
        --nodeTypes t2.large:0.20 -w 1-4 \
        --nodeStorage 20 \
        --logDebug
Individual jobs can explicitly specify whether they should be run on preemptible nodes via the boolean preemptible
resource requirement in Toil’s Python API. In CWL, this is exposed as a hint UsePreemptible in the
http://arvados.org/cwl# namespace (usually imported as arv). In WDL, this is exposed as a runtime attribute
preemptible as recognized by Cromwell. Toil’s Kubernetes batch system will prefer to schedule preemptible jobs
on preemptible nodes.
If a job is not specified to be preemptible, the job will not run on preemptible nodes even if preemptible nodes
are available, unless the workflow is run with the --defaultPreemptible flag. The --defaultPreemptible flag will allow
jobs without an explicit preemptible requirement to run on preemptible machines. For example:
$ python3 /root/sort.py aws:us-west-2:<my-jobstore-name> \
      --batchSystem kubernetes \
      --defaultPreemptible
Specify Preemptibility Carefully
Ensure that your choices for --nodeTypes and --maxNodes <> make
sense for your workflow and won’t cause it to hang. You should make sure the
provisioner is able to create nodes large enough to run the largest job
in the workflow, and that non-preemptible node types are allowed if there are
non-preemptible jobs in the workflow.
Using MinIO and S3-Compatible object stores
Toil can be configured to access files stored in an S3-compatible object store such as MinIO. The following environment variables can be used to configure the S3 connection used:
TOIL_S3_HOST: the IP address or hostname to use for connecting to S3TOIL_S3_PORT: the port number to use for connecting to S3, if neededTOIL_S3_USE_SSL: enable or disable the usage of SSL for connecting to S3 (Trueby default)
Examples:
TOIL_S3_HOST=127.0.0.1
TOIL_S3_PORT=9010
TOIL_S3_USE_SSL=False
In-Workflow Autoscaling with Mesos
Instead of the normal Kubernetes-based autoscaling, you can also use Toil’s old Mesos-based autoscaling method, where the scaling logic runs inside the Toil workflow. With this approach, a Toil cluster can only run one workflow at a time. This method also does not work on the ARM architecture.
In this mode, the --preemptibleCompensation flag can be used to handle cases where preemptible nodes may not be
available but are required for your workflow. With this flag enabled, the autoscaler will attempt to compensate
for a shortage of preemptible nodes of a certain type by creating non-preemptible nodes of that type, if
non-preemptible nodes of that type were specified in --nodeTypes.
Note
This approach is deprecated, because the Mesos project is no longer publishing up-to-date builds.
Download
sort.pyLaunch a Mesos leader node in AWS using the Launch-Cluster Command command, without using any ranges of node counts:
(venv) $ toil launch-cluster <cluster-name> \
             --clusterType mesos \
             --keyPairName <AWS-key-pair-name> \
             --leaderNodeType t2.medium \
             --zone us-west-2a
Copy the
sort.pyworkflow up to the leader node:(venv) $ toil rsync-cluster -z us-west-2a <cluster-name> sort.py :/root
Login to the leader node:
(venv) $ toil ssh-cluster -z us-west-2a <cluster-name>
Run the workflow with in-workflow autoscaling, specifying a provisioner and node types and counts as workflow arguments:
$ python3 /root/sort.py aws:us-west-2:<my-jobstore-name> \
      --provisioner aws \
      --nodeTypes c3.large \
      --maxNodes 2 \
      --batchSystem mesos
Note
In this example, the autoscaling Toil code creates up to two instances of type c3.large and launches Mesos
agent containers inside them. The containers are then available to run jobs defined by the sort.py workflow.
Toil also creates a bucket in S3 called aws:us-west-2:autoscaling-sort-jobstore to store intermediate job
results. The Toil autoscaler can also provision multiple different node types, which is useful for workflows
that have jobs with varying resource requirements. For example, one could execute the workflow with
--nodeTypes c3.large,r3.xlarge --maxNodes 5,1, which would allow the provisioner to create up to five
c3.large nodes and one r3.xlarge node for memory-intensive jobs. In this situation, the autoscaler would avoid
creating the more expensive r3.xlarge node until needed, running most jobs on the c3.large nodes.
View the generated file to sort:
$ head fileToSort.txt
View the sorted file:
$ head sortedFile.txt
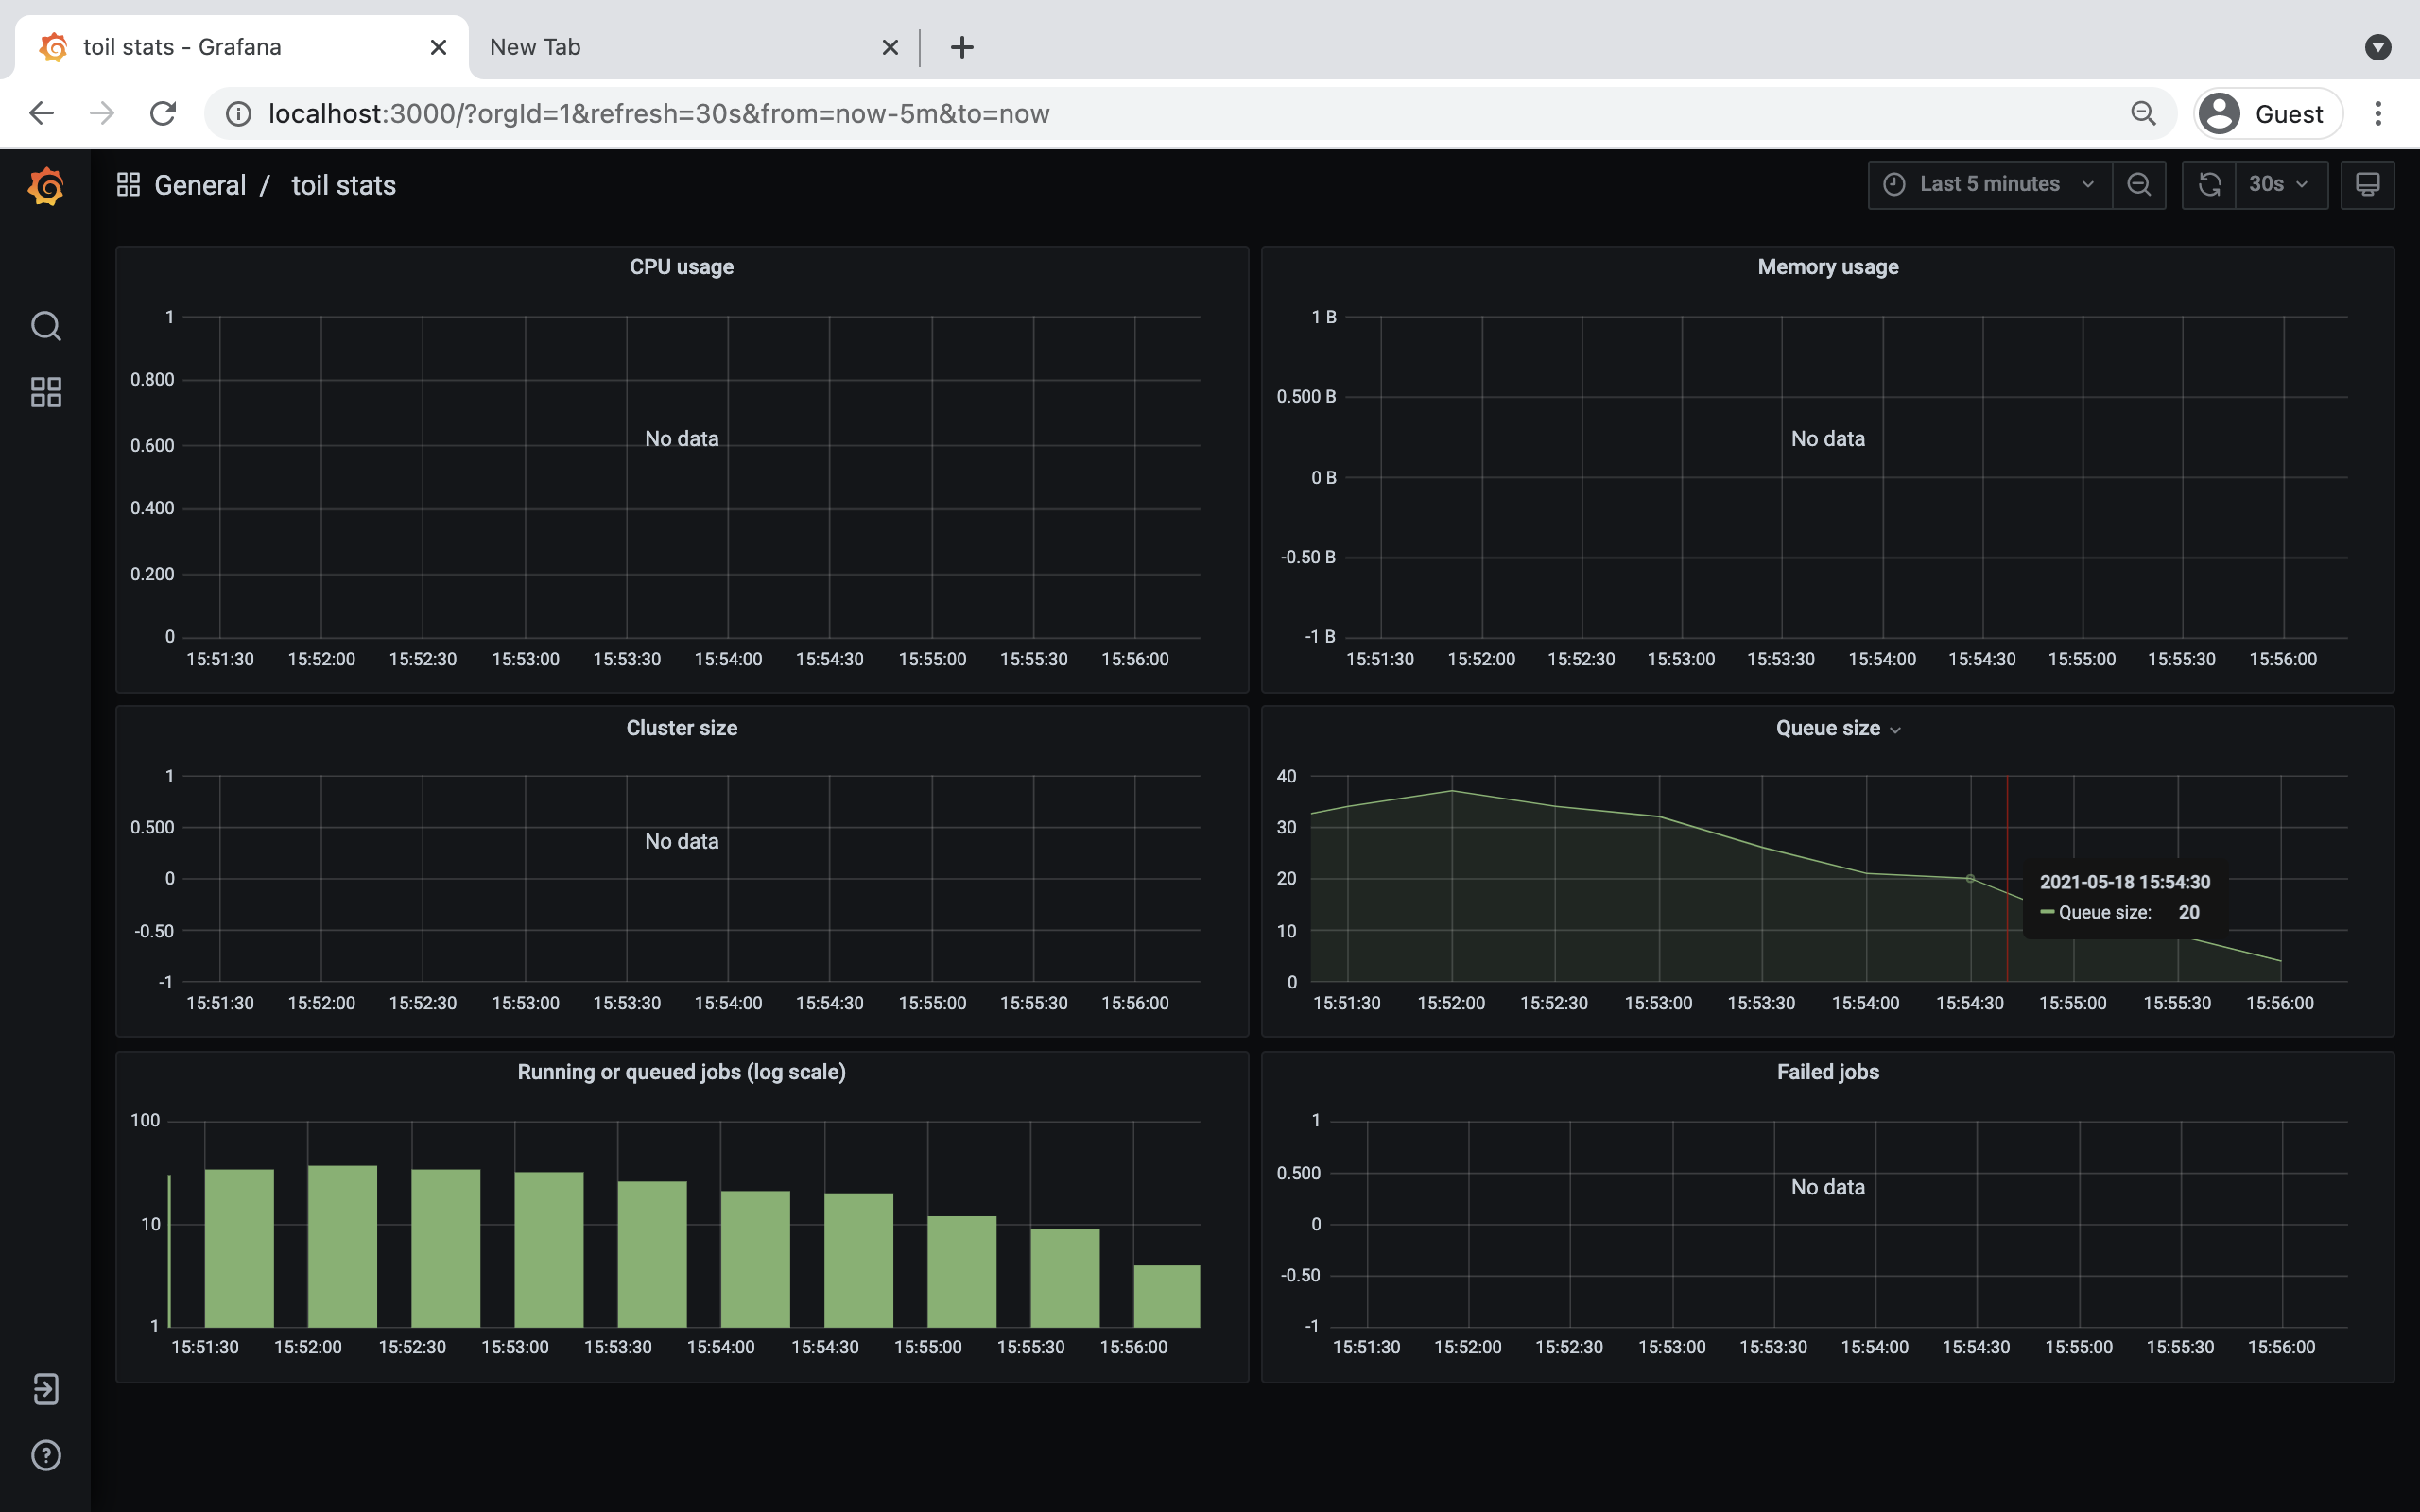
Dashboard
Toil provides a dashboard for viewing the RAM and CPU usage of each node, the number of
issued jobs of each type, the number of failed jobs, and the size of the jobs queue. To launch this dashboard
for a Toil workflow, pass the --metrics flag on the workflow’s command line. The dashboard can then be viewed
in your browser at localhost:3000 while connected to the leader node through toil ssh-cluster:
To change the default port number, you can use the --grafana_port argument:
(venv) $ toil ssh-cluster -z us-west-2a --grafana_port 8000 <cluster-name>
On AWS, the dashboard keeps track of every node in the cluster to monitor CPU and RAM usage, but it can also be used while running a workflow on a single machine. The dashboard uses Grafana as the front end for displaying real-time plots, and Prometheus for tracking metrics exported by toil:
In order to use the dashboard for a non-released toil version, you will have to build the containers locally with
make docker, since the prometheus, grafana, and mtail containers used in the dashboard are tied to a specific toil
version.
